
Job Workflows
Job Workflows
The Job's most basic feature is its ability to execute one or more steps. This sequence of steps is called a workflow.
The steps of the Job workflow are displayed when viewing a Job's detail from a Job listing or within the Job editor form.
Workflow definition
Workflows can be defined within the Rundeck graphical console or as an XML or YAML document that is loaded to the server.
The graphical console provides an authoring environment where steps can be added, edited, removed or reordered.
Users preferring to define Jobs in a text format should refer to the two format definitions:
It is also possible to author Jobs inside the graphical console and then export the definition as a file using the rd CLI tool (rd), or via the API.
See Command Line Tools and API Acccess.
Workflow control settings
Workflow execution is controlled by two important settings: Handling a step failure and Strategy.
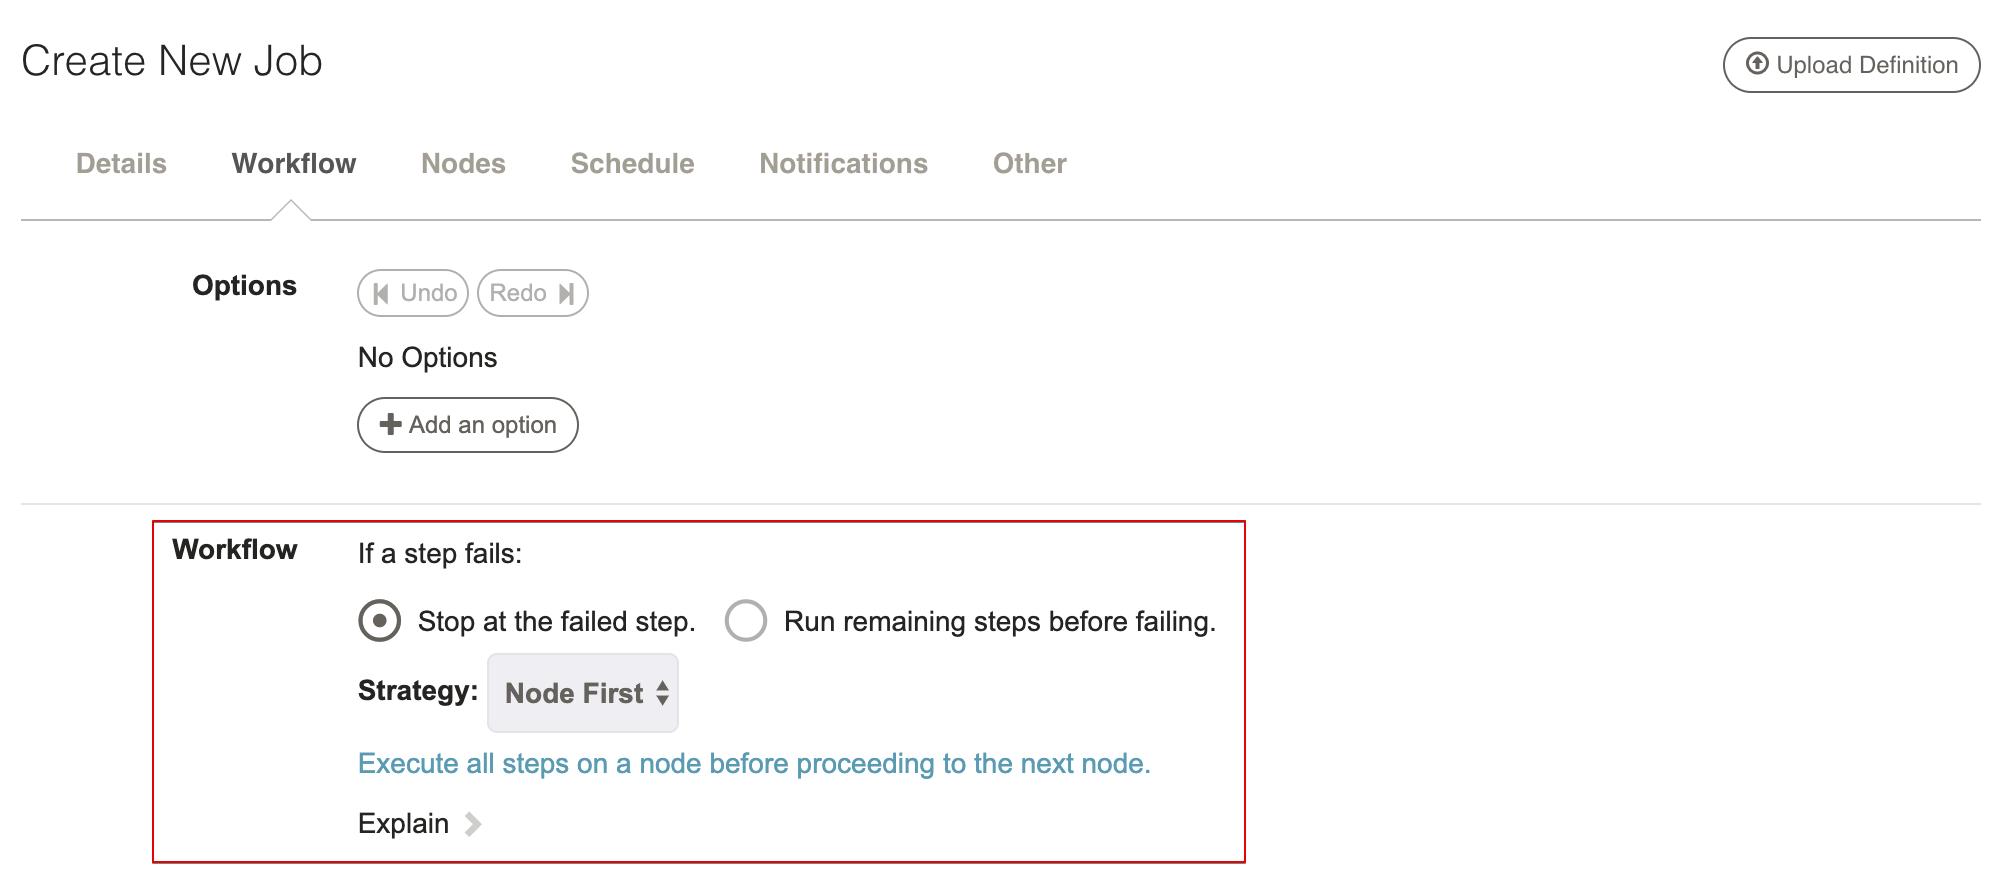
If a step fails: This manages what to do if a step incurs an error:
- Stop at the failed step: Fail immediately (default).
- Run remaining steps before failing: Continue to next steps and fail the job at the end.
The default is to fail immediately but depending on the procedure at hand it is possible to choose to have the execution continue.
Strategy: Controls the order of execution of steps and command dispatch to nodes: Node-oriented and Step-oriented.
- Node First: Executes the full workflow on each node before the next node. (default)
- Sequential: Executes each step on all nodes before the next step.
- Parallel: Run all steps in parallel.
The following illustrations contrast the strategies showing how three steps proceed across two nodes.
Node First flow illustrated:
1.   NodeA    step#1
2.     "      step#2
3.     "      step#3
4.   NodeB    step#1
5.     "      step#2
6.     "      step#3
Sequential flow illustrated:
1.   NodeA    step#1
2.   NodeB      "
3.   NodeA    step#2
4.   NodeB      "
5.   NodeA    step#3
6.   NodeB      "
The process being automated will determine which strategy is correct, though the node-oriented flow is more commonplace.
For more complex workflow strategy rules, see Ruleset Workflow Strategy Plugin
Workflow steps
The following sections describe how to construct a workflow as a set of steps of different types.
When creating a new Job definition, the Workflow form will be set with defaults and have no workflow steps defined. The workflow editor will have a form open asking to choose a step type to add.
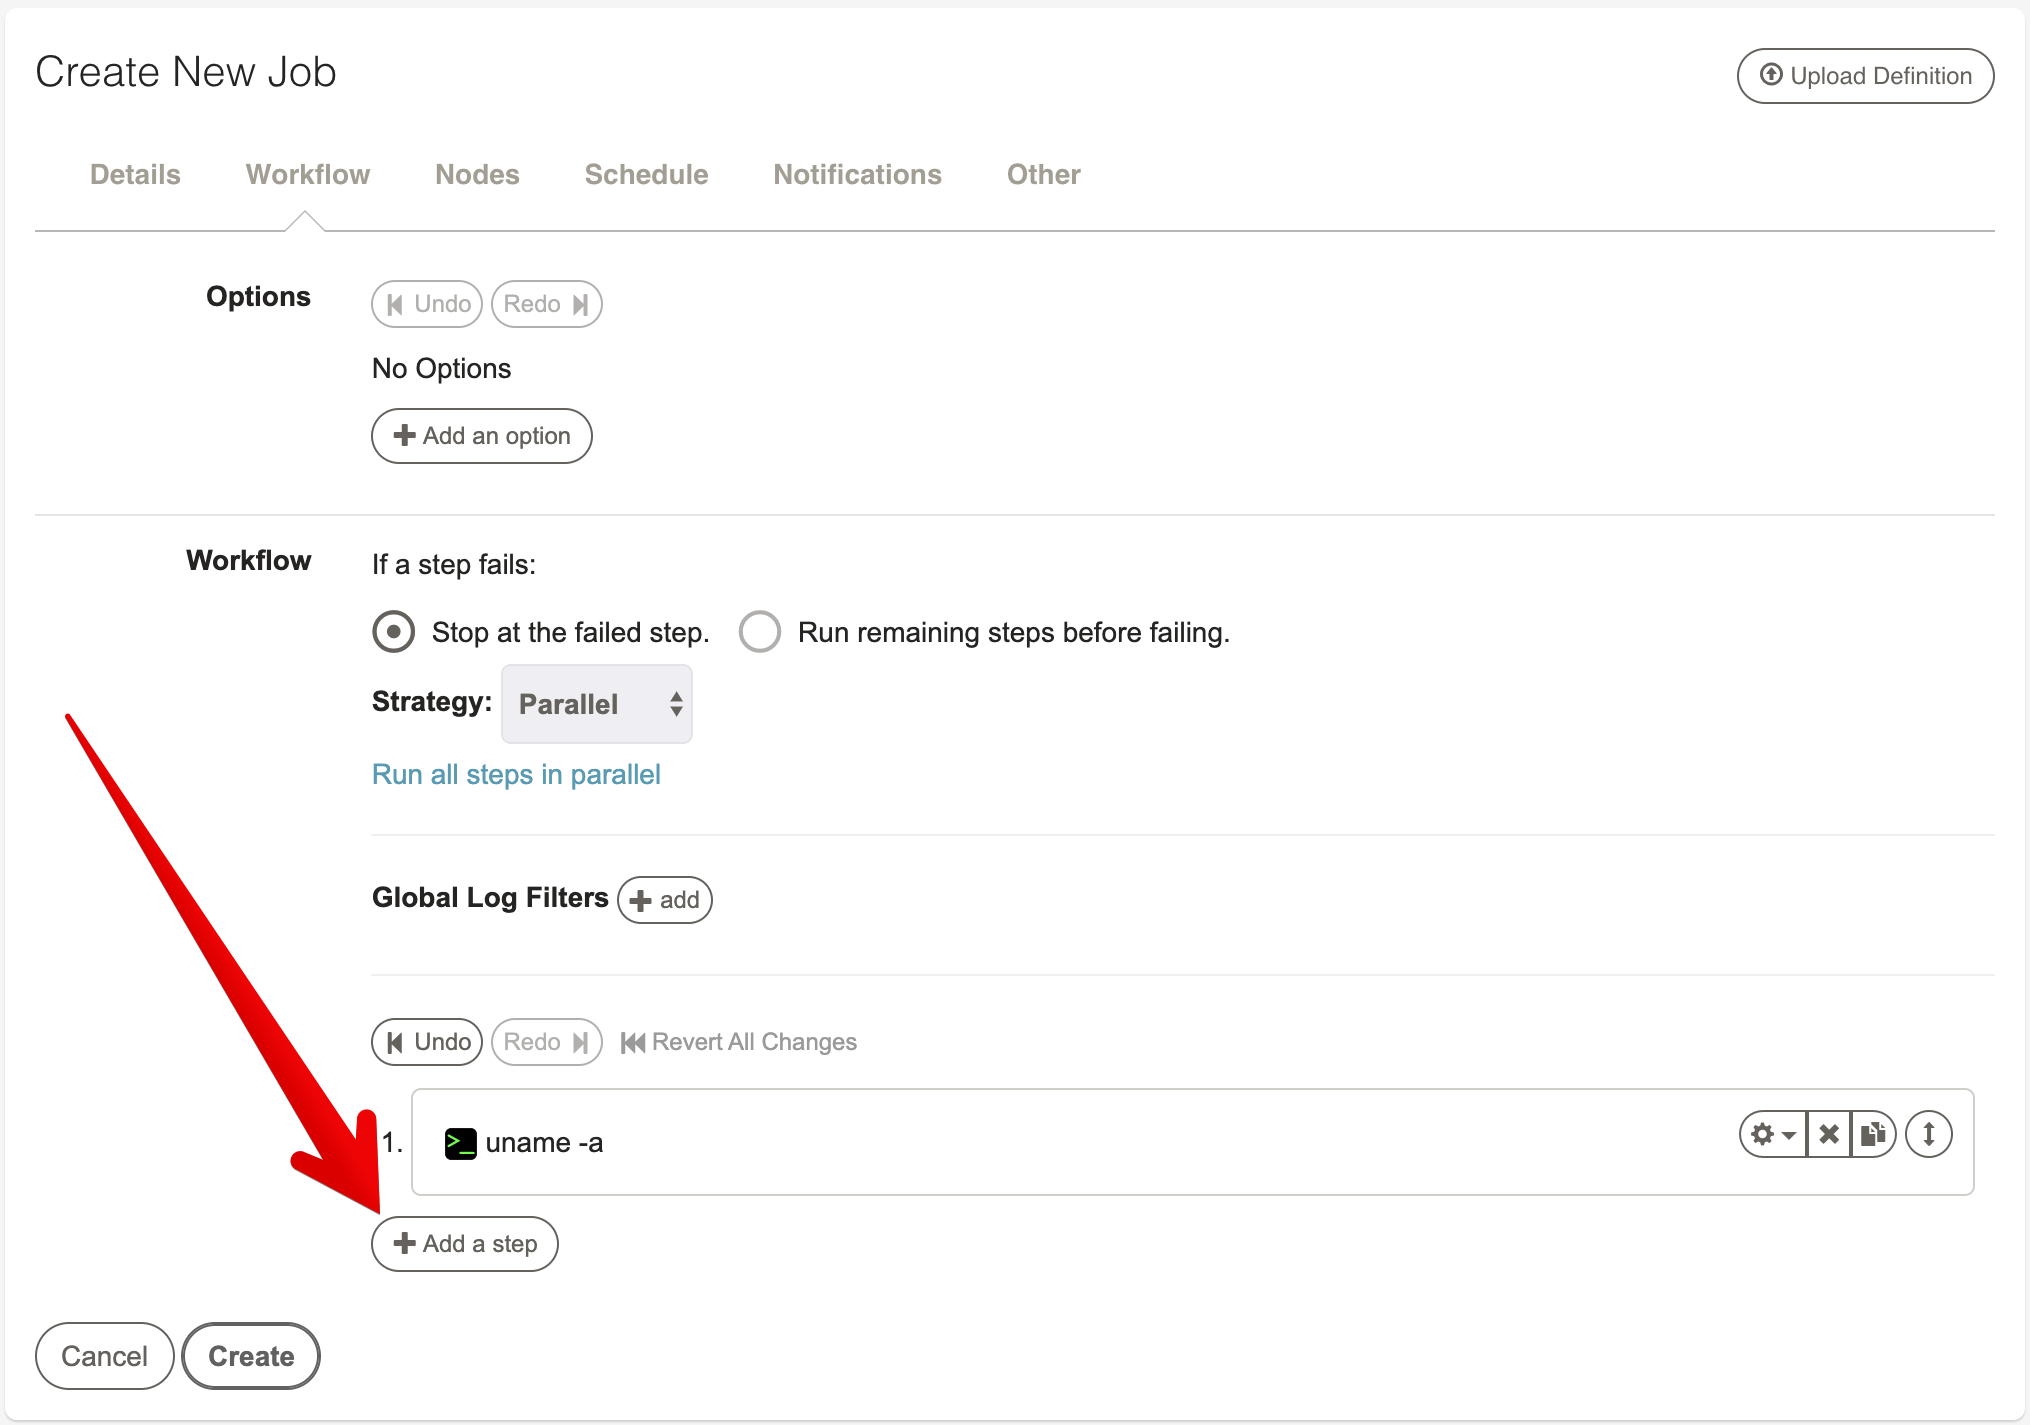
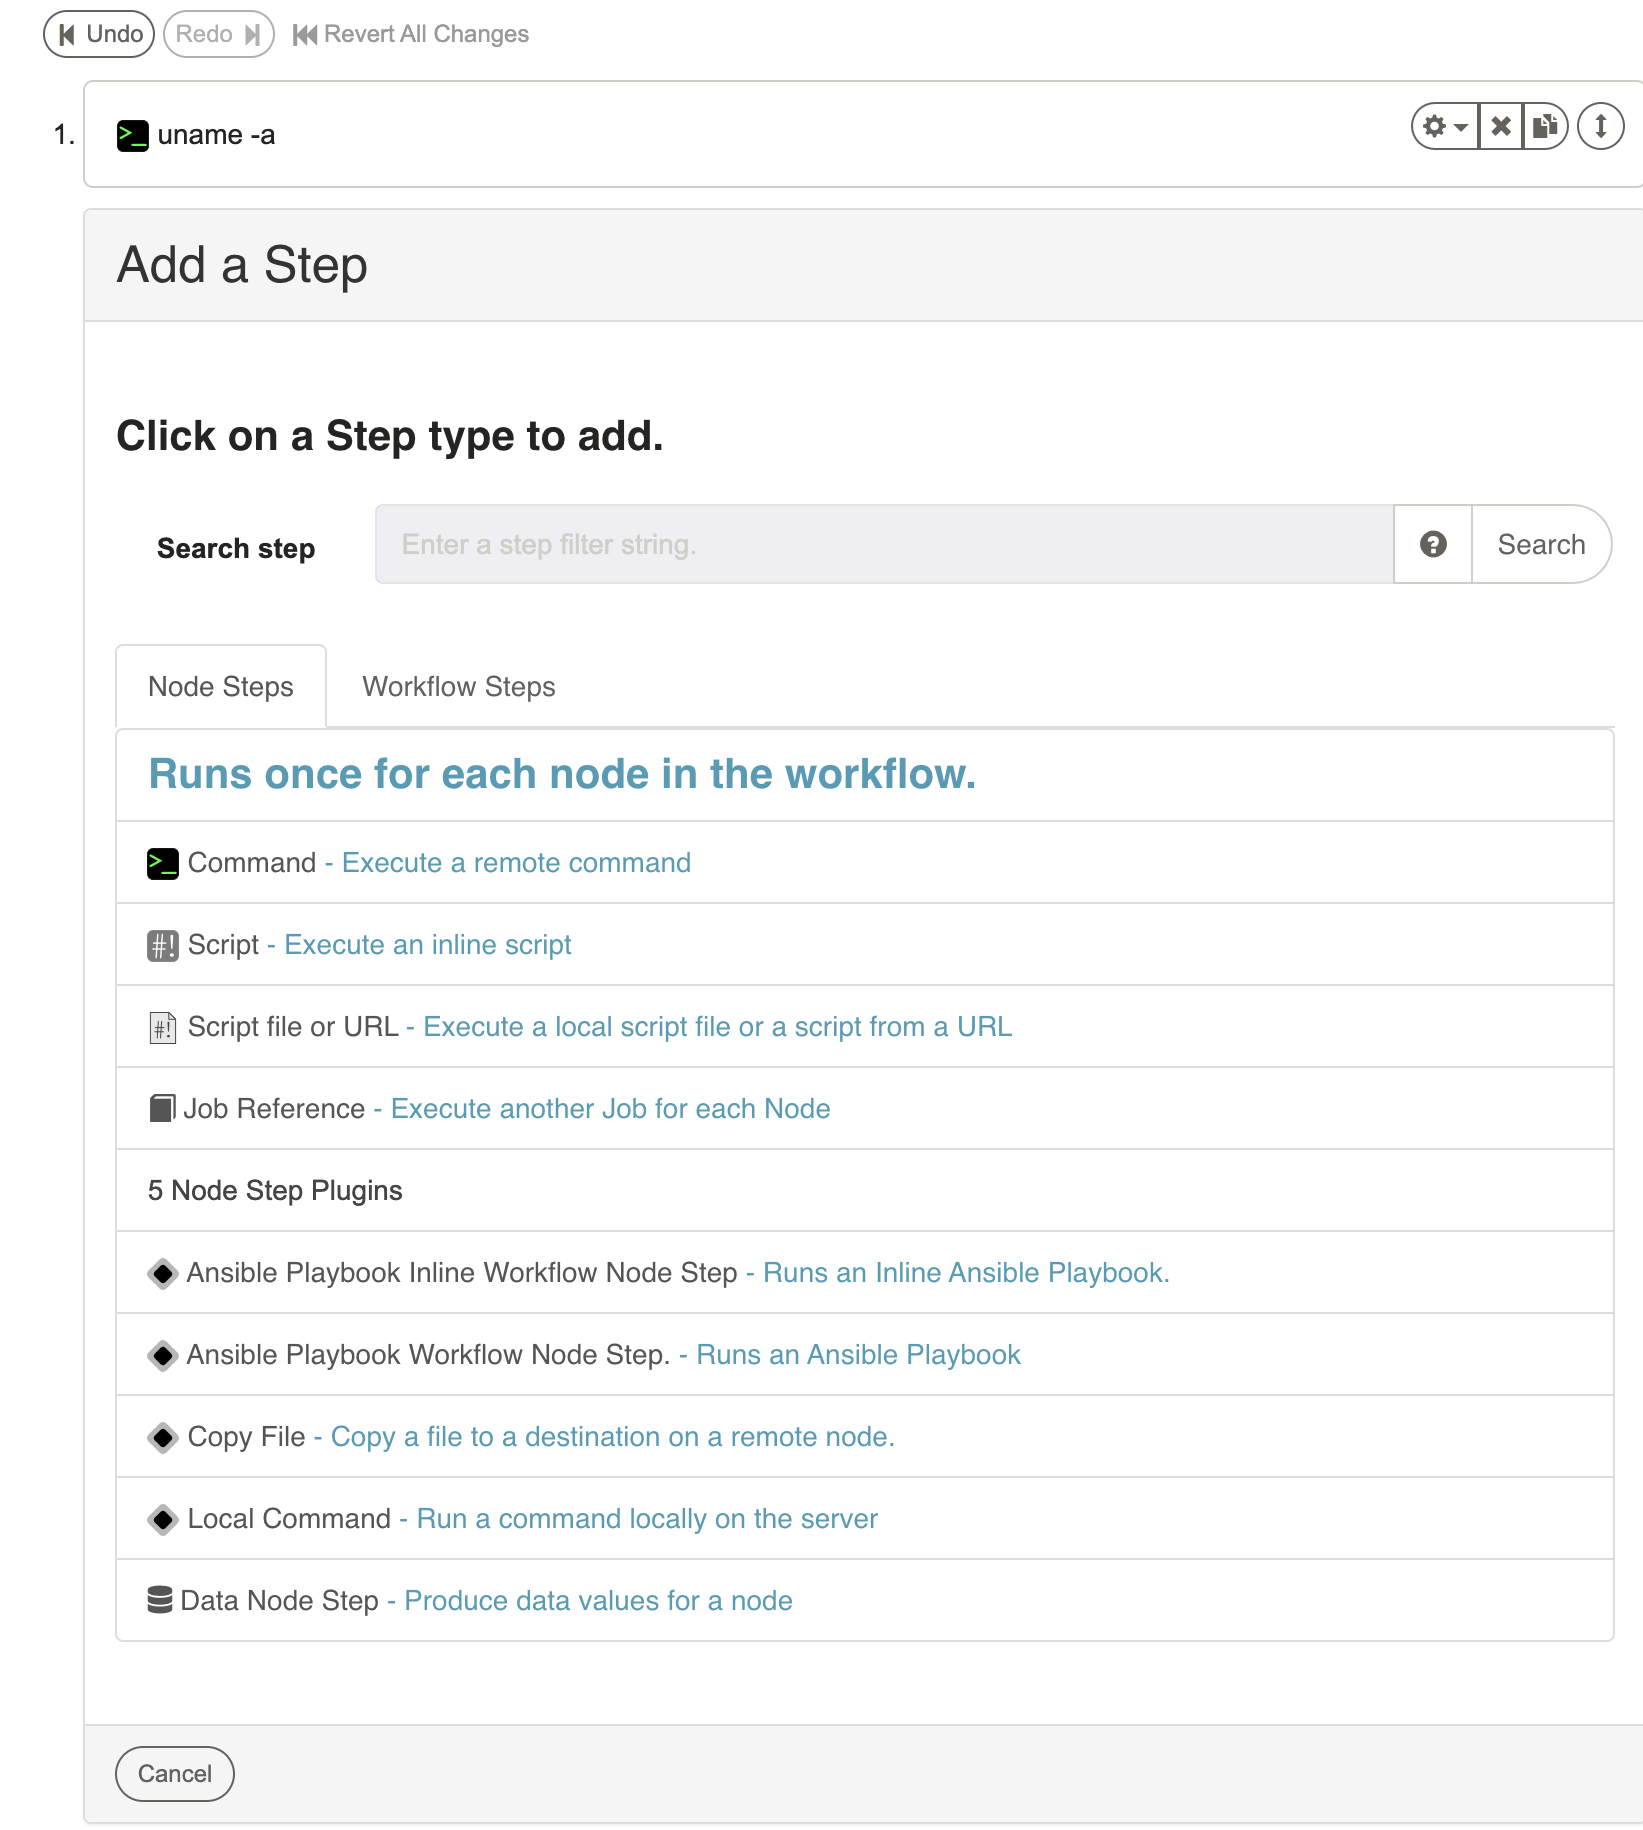
To add new steps simply press the "Add a step" link inside the workflow editor form. This will prompt with a dialog asking which kind of step to add. Each kind of step has its own form. When the form is completed, press "Save" to add it to the sequence. Pressing "Cancel" will close the form and leave the sequence unchanged.
New steps are always added to the end of the sequence. See Reordering steps for directions on moving steps into a new order.
Each step can have a "Description" to give it a more logical name or description to be displayed in the Rundeck GUI.
The next several sections describe the specification of each kind of workflow step.
Types of Steps
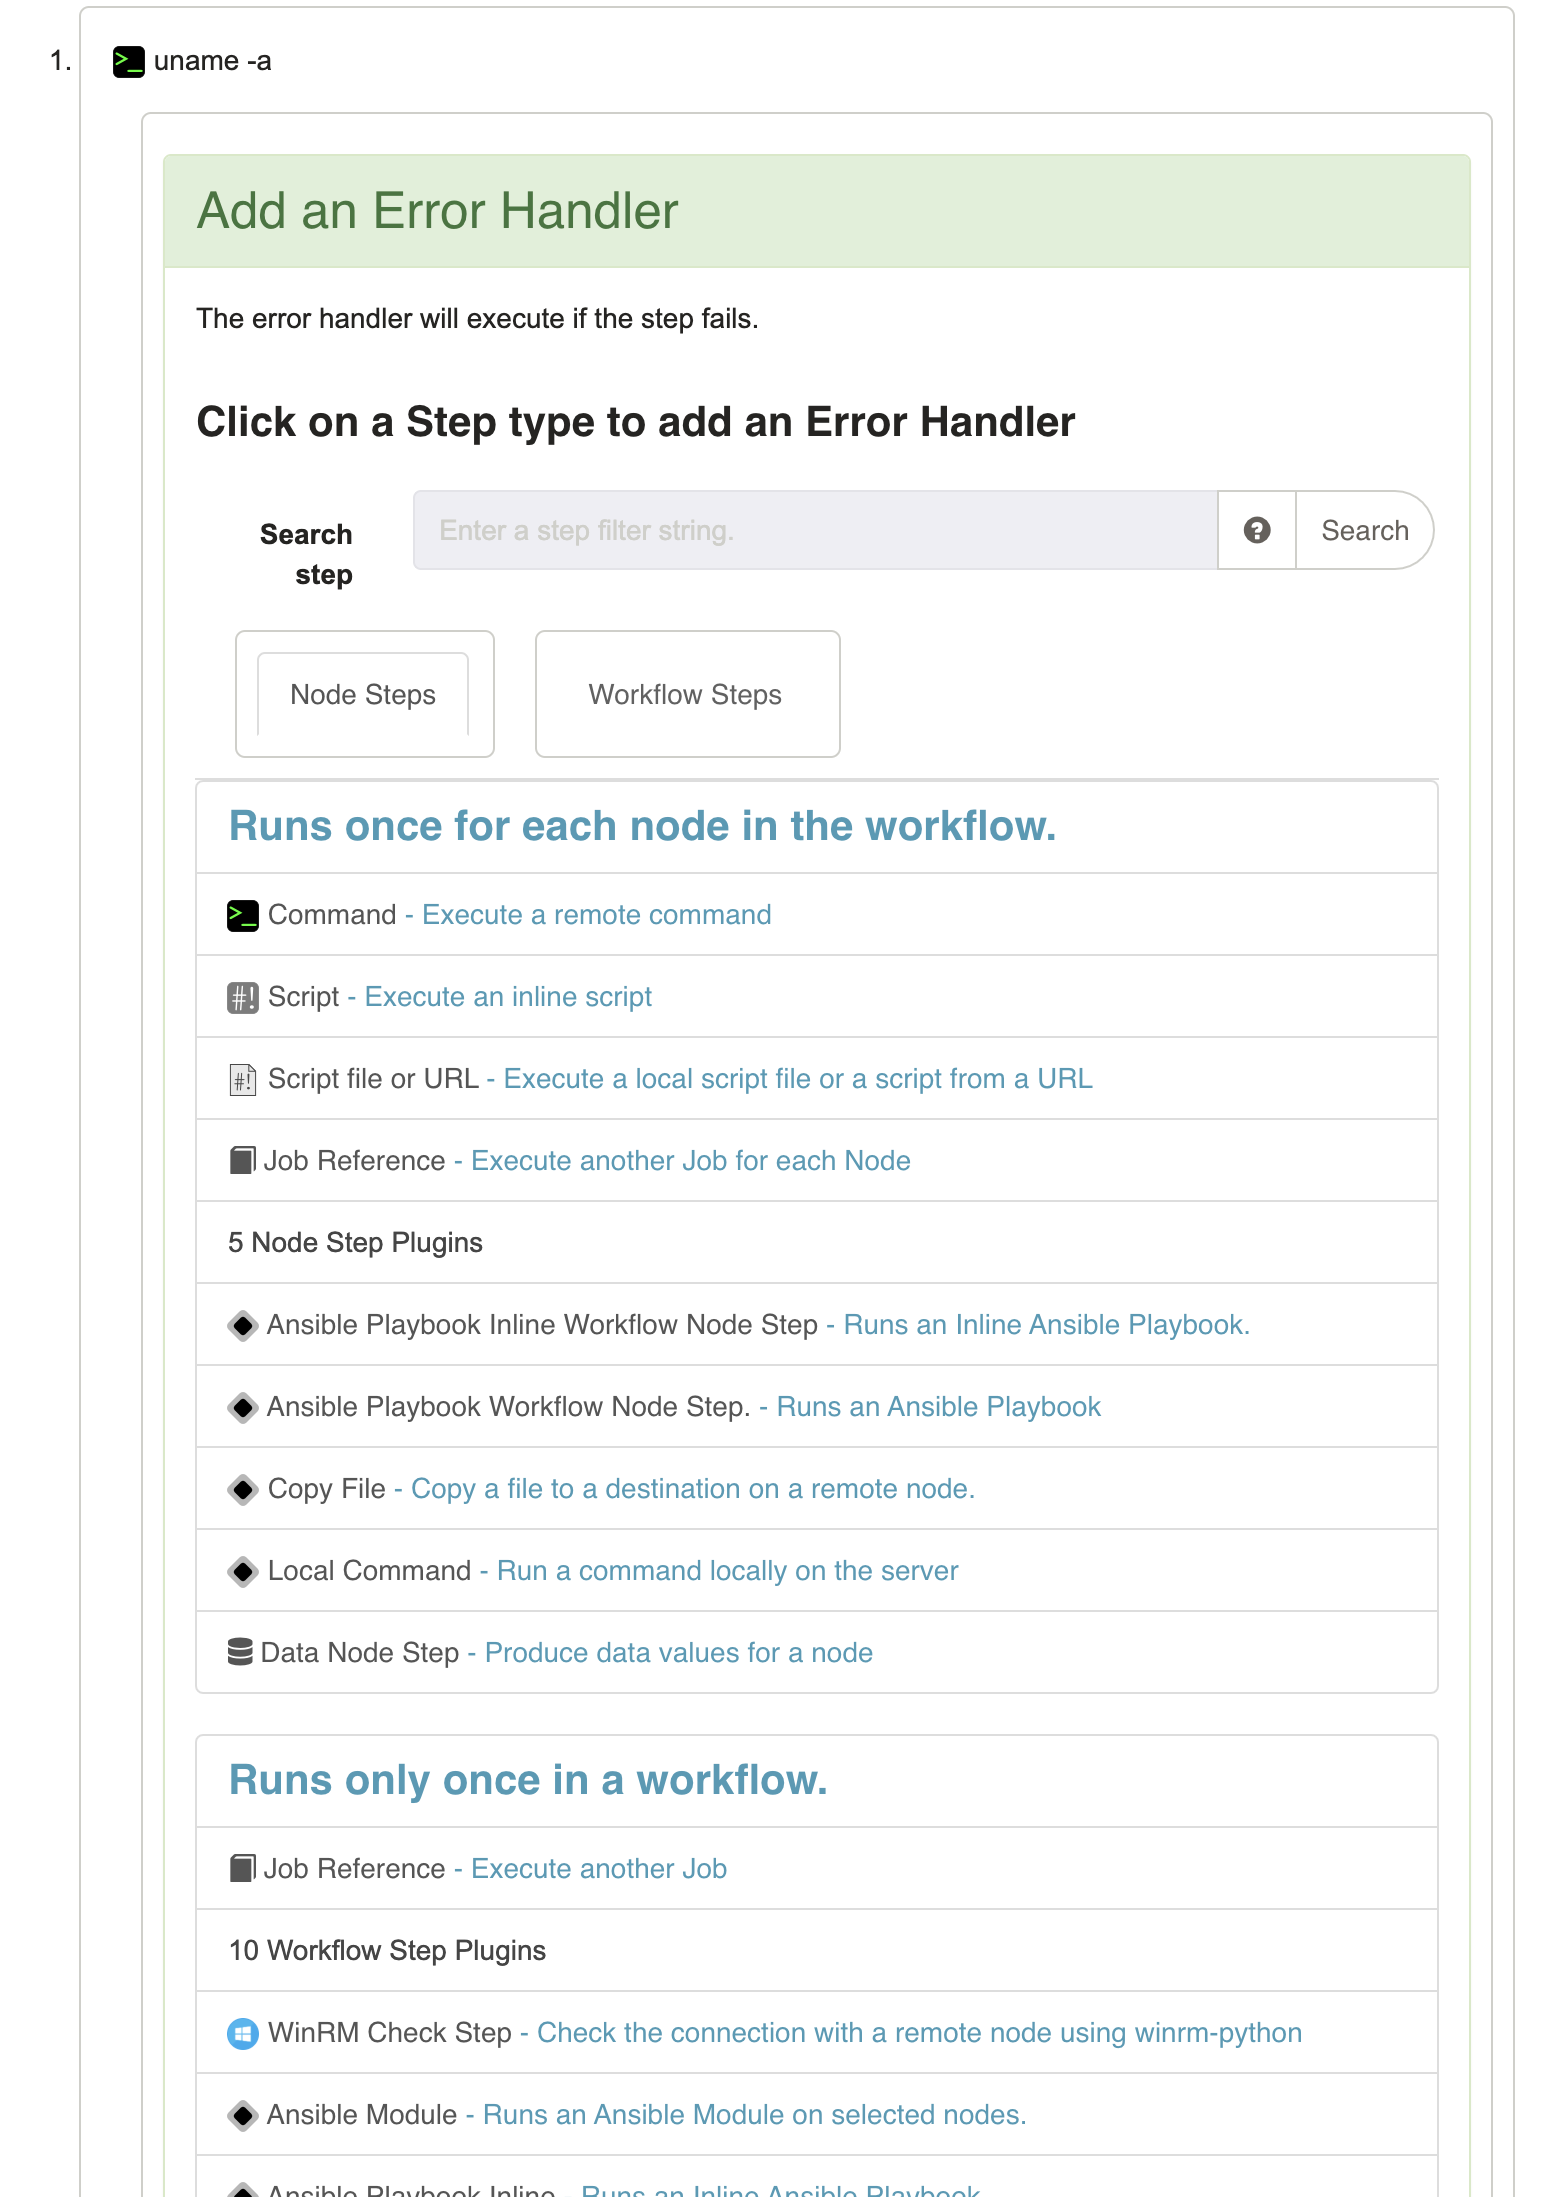
Steps in a workflow can be either Node Steps or Workflow Steps.
- Node Steps operate once on each Node, which could be multiple times within a workflow. For a full list of Node Steps, see Job Plugins - Node Steps
- Workflow Steps operate only once in the workflow. For a full list of Workflow Steps, see Workflow Steps
Reordering steps
The order of the Workflow steps can be modified by hovering over any step and then clicking and dragging the double arrow icon to the desired position.
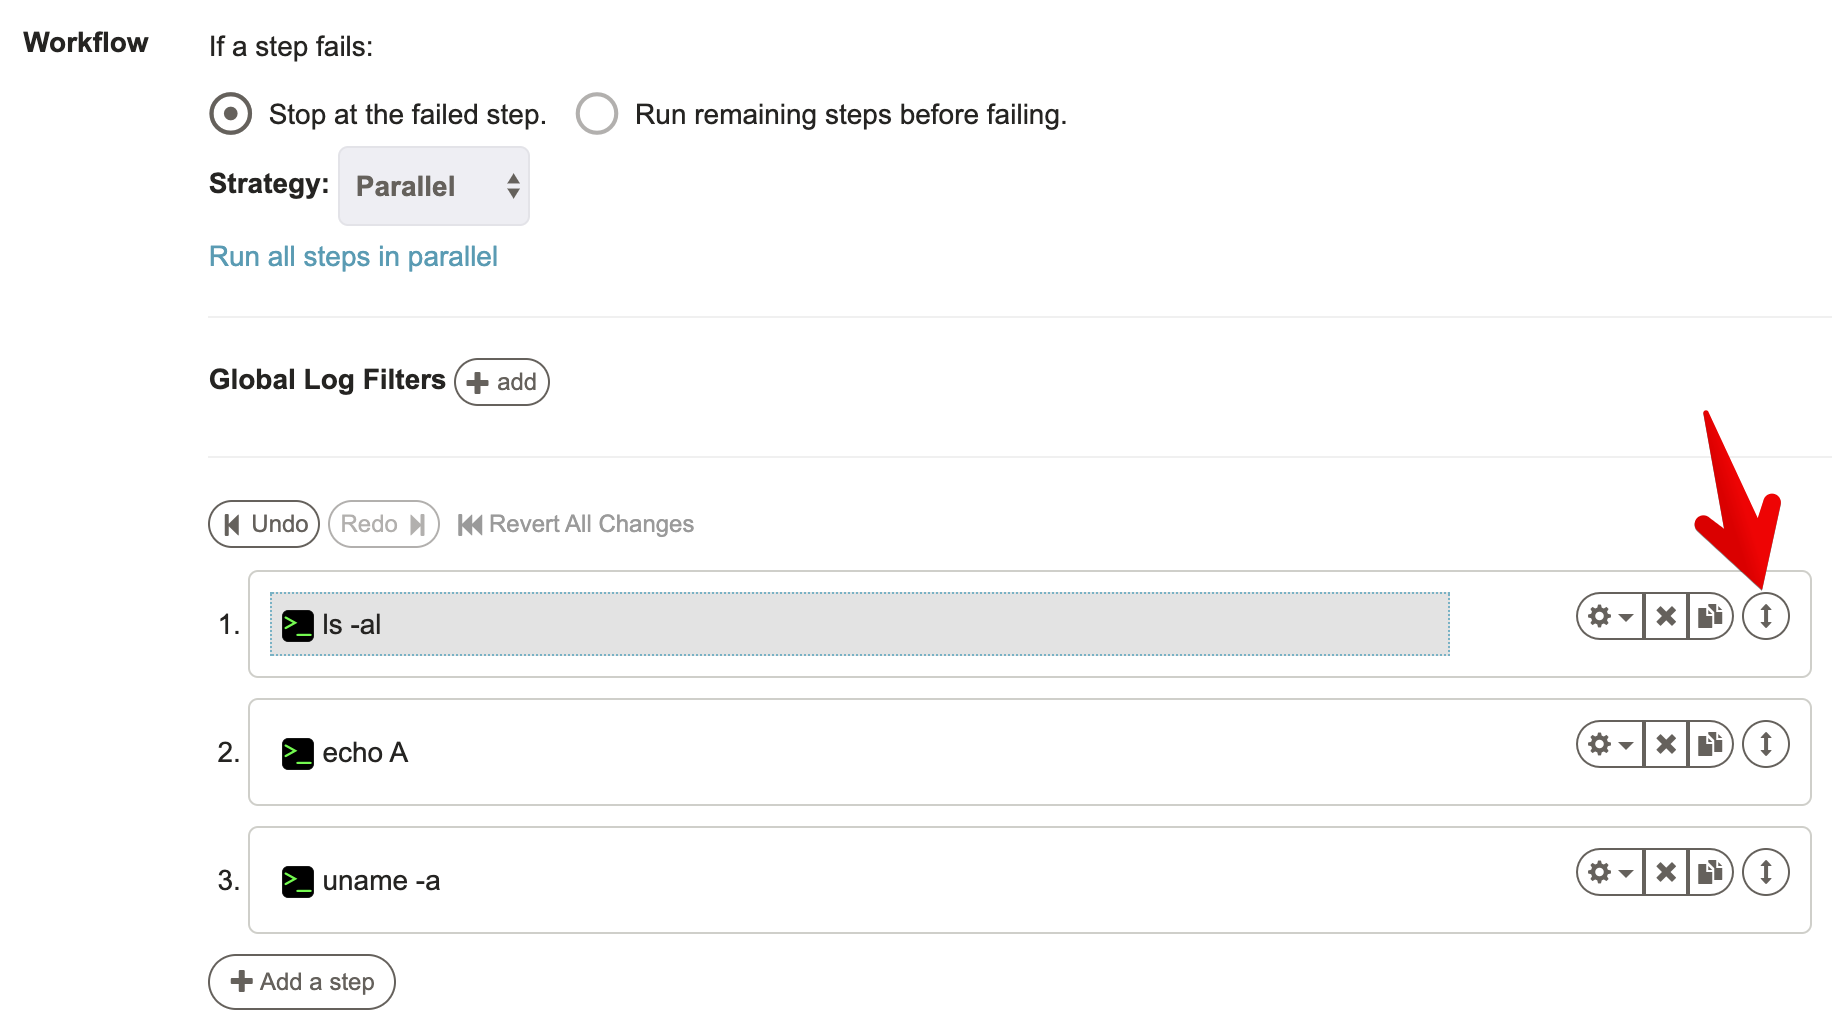
A blue horizontal bar helps highlight the position where the Job will land.
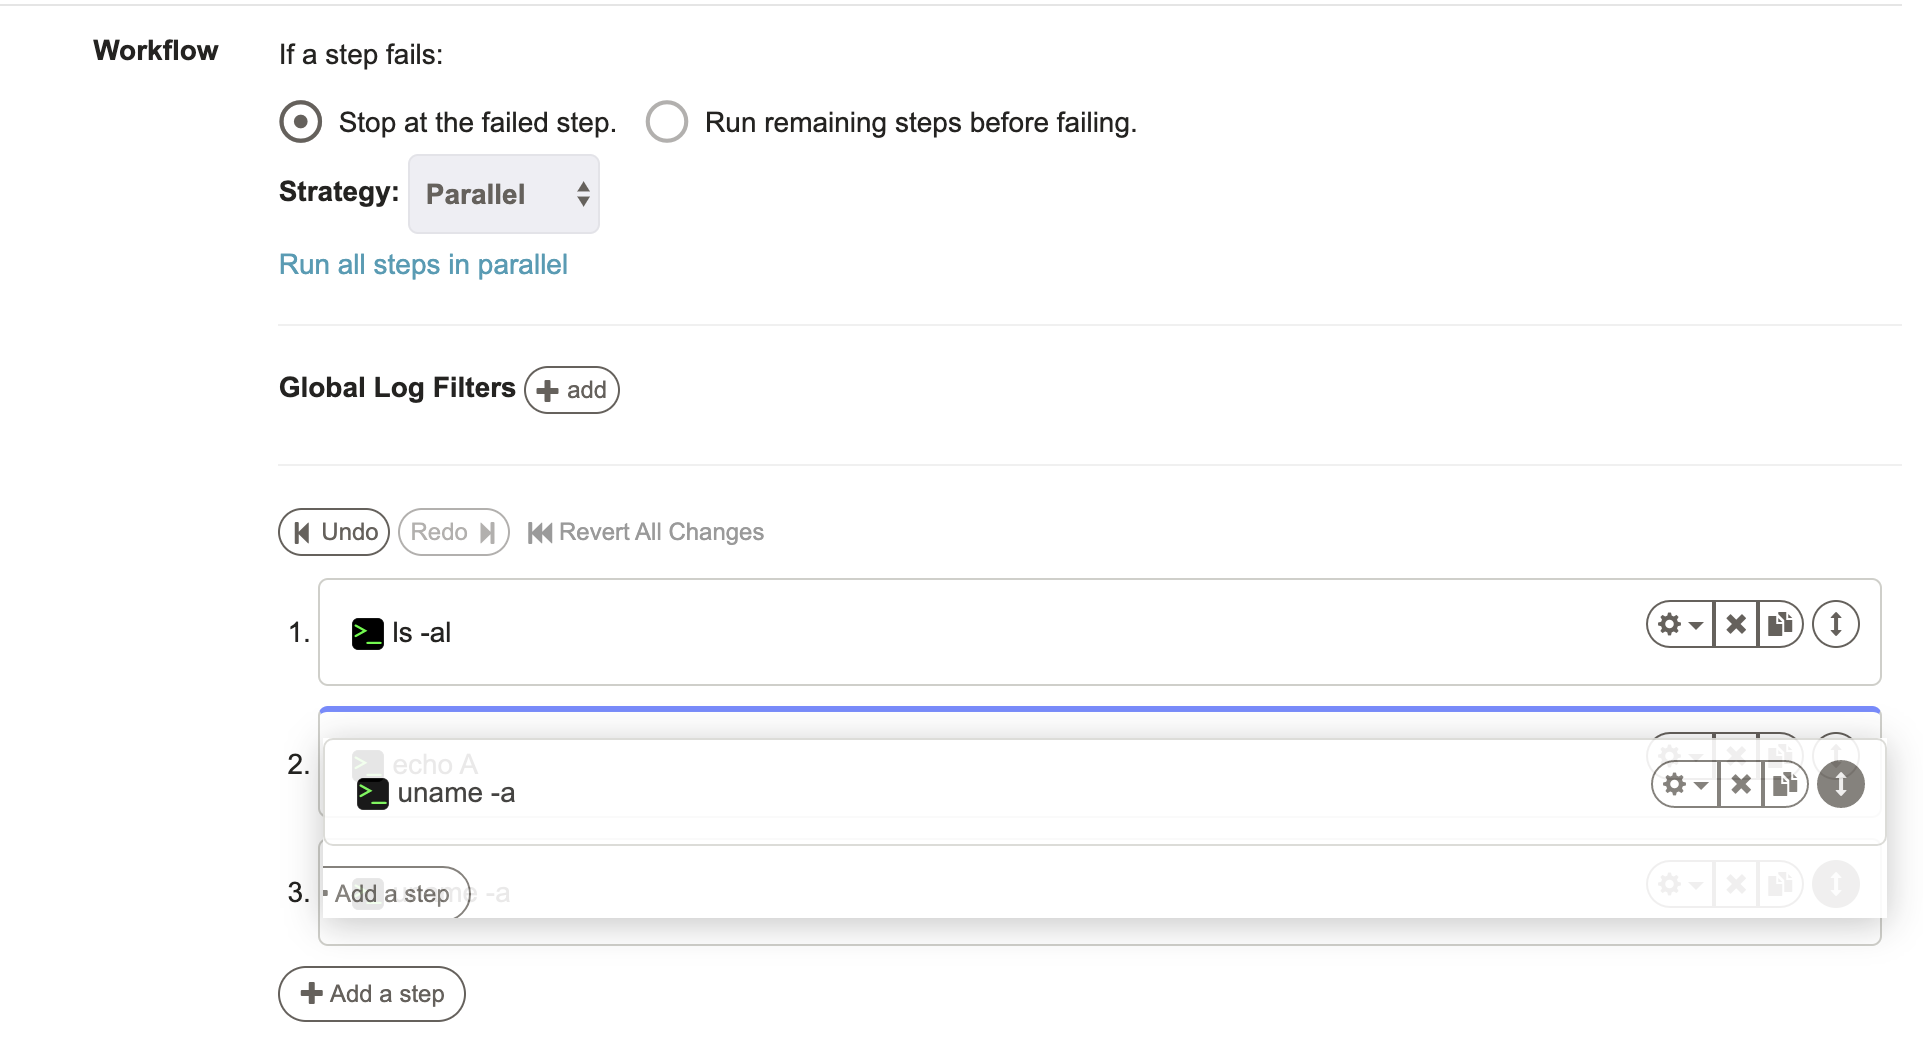
After releasing the select Job, it will land in the desired position and the step order will be updated.
To Undo the step reordering, press the "Undo" link above the steps.
The "Redo" button can be pressed to reapply the last undone change.
Press the "Revert All Changes" button to go back to the original step order.
Error Handlers
Each step in a Workflow can have an associated "Error Handler" action. This handler is a secondary step of any of the available types that will execute if the Workflow step fails. Error Handler steps can be used to recover the workflow from failure, or simply to execute a secondary action.
This provides a few different ways to deal with a step's failure:
- Print additional information about a failure
- Roll back a change
- Recover the workflow from failure, and continue normally
When a Workflow step has a failure, the behavior depends on whether it has an Error Handler or not, and the value of the "runRemainingOnFail" and "keepGoingOnSuccess" settings for the workflow and Error Handler respectively.
Essentially, the result status of the Error Handler becomes the result status of its Step. In other words: "If the Error Handler succeeds, then the step is not considered to have failed".
Workflow Behavior
- When a step fails without an Error Handler
- The Workflow is marked as "failed".
- If
runRemainingOnFail="false"- The entire Workflow stops.
- Otherwise, the remaining Workflow steps are executed in order.
- The Workflow ends with a "failed" result status.
If a job is defined with an Error Handler for a step, the behavior changes. This one can recover from the step failure by executing successfully or, as previously said, perform a secondary action.
A "keepGoingOnSuccess" checkbox will override the Workflow's "runRemainingOnFail" value if it is false:
- When a step fails with an Error Handler
- The Error Handler is executed.
- If the Error Handler is successful:
runRemainingOnFail="false"andkeepGoingOnSuccess="false"- The Step is marked as a success.
- Remaining steps don't run.
- Workflow execution status is marked as Failed.
runRemainingOnFail="true"orkeepGoingOnSuccess="true"- The Workflow failure status is not marked, and it will continue to the next step.
- If the Error Handler fails:
- The step is marked as Failed
- The workflow behaves according to the
runRemainingOnFailvariable.
Tips
When defining error handlers, it is a good practice to use a step that will always fail (e.g. scripts/commands return a non-zero exit-code) so that rundeck can show the step as FAILED, unless it is specifically to be used for Recovery.
Tips
Error-handlers can be attached to either Node Steps or Workflow Steps, and the type of step and the Strategy of the Workflow determines what type of Error-handler steps can be attached to a step. The only restriction is in the case that the Workflow is "Node-oriented", which means that the workflow is executed independently for each node. In this case, Node Steps can only have other Node steps as Error Handlers. In other cases, the Error Handler can be other Workflow steps.
To add an error handler press the "settings" button on the step to handle.
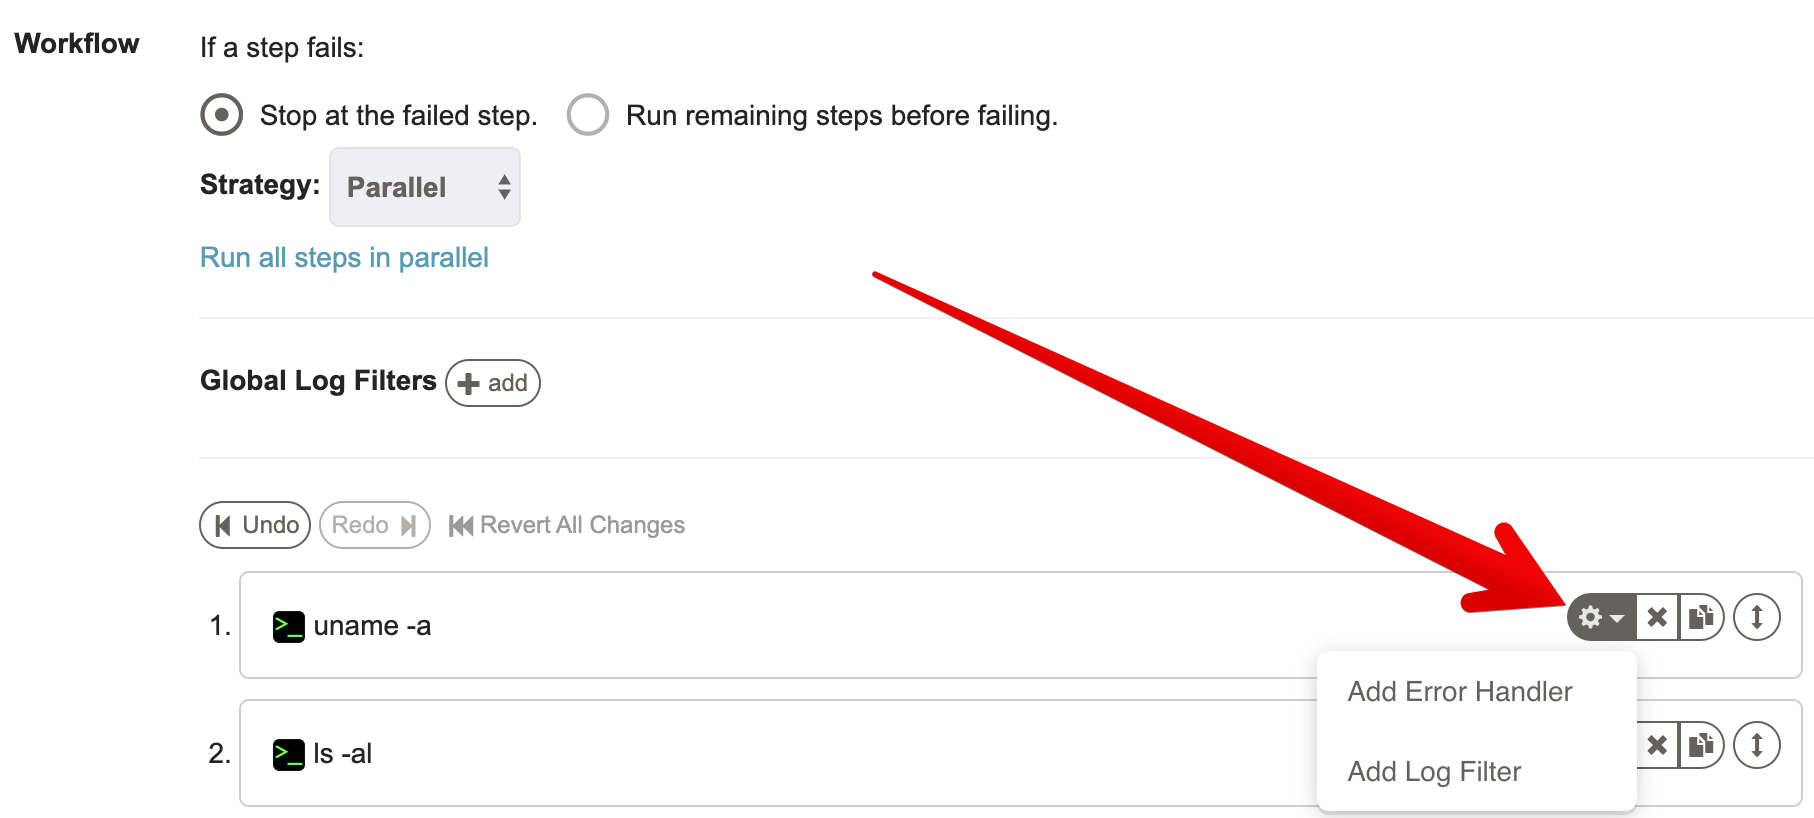
The form presented includes the normal set of steps that can be added to a workflow.
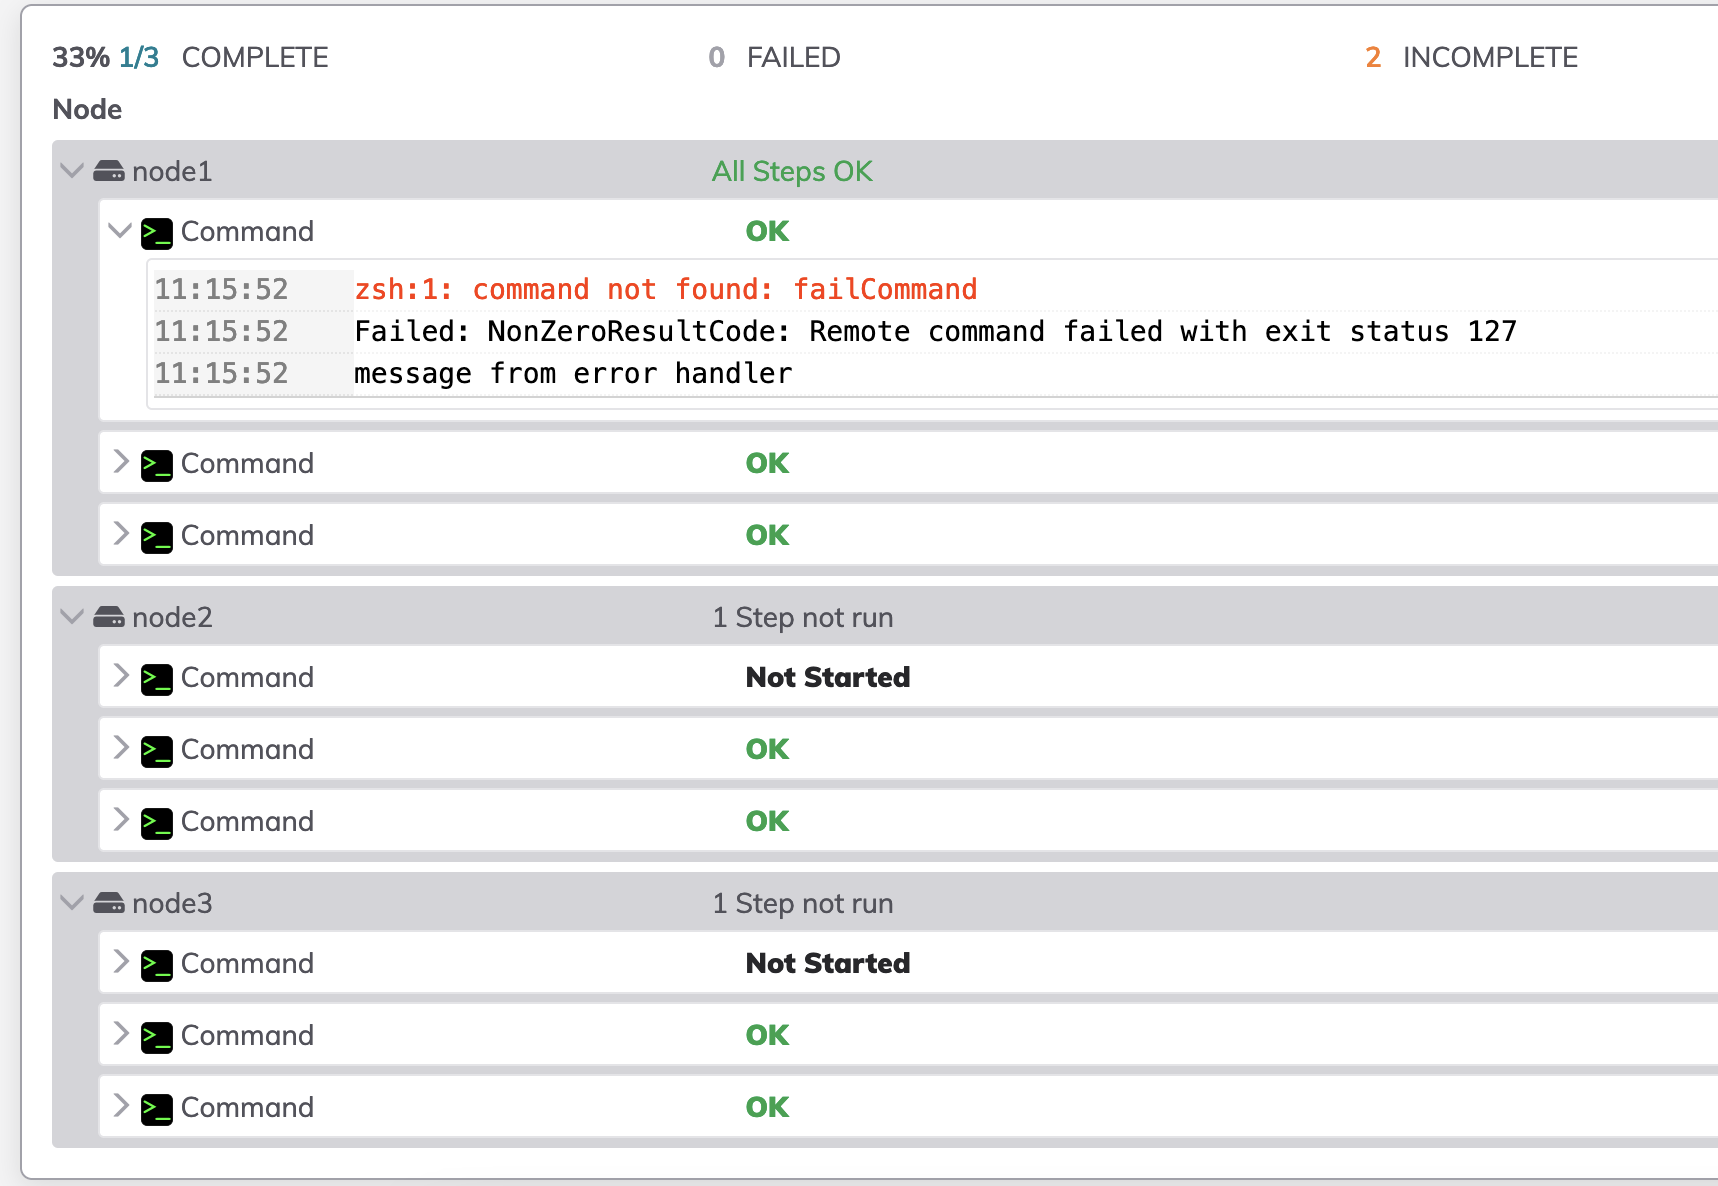
Error handler with sequential workflow strategy
When using Sequential workflow strategy, the error handler gets triggered once in the first node that fails to execute the step and it won't run the step on the remaining nodes unless "Continue running on any remaining nodes before failing the step" is selected in the Nodes tab.
Here is the log output when using error handler with sequential workflow strategy
Context information
When the Error-handler step is executed, its execution context will contain some information about the nature of the failure that occurred for the original step.
In the case where a Node Step has a Workflow Step as an Error Handler, then the failure data for multiple nodes is rolled up into a single failure reason to be used by the Workflow Step.
See the section on Context Variables for more information.
Save the changes
Once the Workflow steps have been defined and order, changes are permanently saved after pressing the "Create" button if new or the "Update" button if the Job is being modified.
Context Variables
When a Job step is executed, it has a set of "context" variables that can be accessed in the Job step. There are several sets of context variables, including: the Job context job, the Node context node, and the Option context option.
Job context variables (Global scope):
job.name: Name of the Jobjob.group: Group of the Jobjob.id: ID of the Jobjob.url: URL to the Job/execution data.job.execid: ID of the current Executionjob.outputfilepath: Contains the path to the log file for the current execution which can be local or remote.job.isRemoteFilePath: This is a flag ("true","false") to identify if the path inoutputfilepathcorresponds to the server file system or a remote file.job.execIdForLogStore: The execution id of the log file which isn't necessarily the same as theexecid(eg: if the execution was imported from another project).job.executionType: Execution type, can beuser,scheduledoruser-scheduledforRun Job Laterexecutionsjob.user.name: Username of the user executing the Jobjob.project: Project namejob.loglevel: Logging level, one of: 'ERROR','WARN','INFO','VERBOSE','DEBUG'job.user.email: Executing user's email address set in User profile.job.retryAttempt: A number indicating the attempt, if this execution is a retry.job.wasRetry:trueif this execution is a retry, otherwisefalse. See: retry.job.threadcount: Threadcount (number of nodes run at once) of the Jobjob.filter: The filter used to select the nodes for this job (if applicable)
Step execution context variable (Global scope):
#:exec.exitCode@<node>: The node specific step (#) exit code. Examples:- ${2:exec.exitCode} is the exit code for step 2 in the current node.
- ${2:exec.exitCode*} is the exit code for step 2 in all nodes.
- ${2:exec.exitCode@nodename} is the exit code for step 2 on a specific node.
Node context variables (Node scope):
node.name: Name of the Node being executed onnode.hostname: Hostname of the Nodenode.username: Username of the remote usernode.description: Description of the nodenode.tags: Comma-separated list of tagsnode.os-*: OS properties of the Node:name,version,arch,familynode.*: All Node attributes defined on the Node.
Additional Error-handler context variables (Global scope):
result.reason: A code indicating the reason the step failed- Common reason code strings used by node execution of commands or scripts:
NonZeroResultCode- the execution returned a non-zero codeSSHProtocolFailure- SSH protocol failureHostNotFound- host not foundConnectionTimeout- connection timeoutConnectionFailure- connection failure (e.g. refused)IOFailure- IO errorAuthenticationFailure- authentication was refused or incorrect
- Reason code strings used by Job references
JobFailed- referenced Job workflow failedNotFound- referenced Job not foundUnauthorized- referenced Job not authorizedInvalidOptions- referenced Job input options invalidNoMatchedNodes- referenced Job node dispatch filters had no match
- Reason code used from a failed Node Step if the handler is a Workflow Step
NodeDispatchFailure- one or more nodes failed the step
- Common reason code strings used by node execution of commands or scripts:
result.message: A string describing the failureresult.resultCode: Exit code from an execution (if available)result.failedNodes: Comma-separated list of node names that failed for aNodeDispatchFailure
Execution context variables (Global scope):
The execution data is included as a Map called execution containing the following keys and values:
Note: The
executionvariables are only available in the Notification context. They are not available while a job is running or as part of Job Steps.
execution.id: ID of the executionexecution.href: URL to the execution output viewexecution.status: Execution state ('running','failed','aborted','succeeded')execution.user: User who started the jobexecution.dateStarted: Start time (java.util.Date)execution.dateStartedUnixtime: Start time as milliseconds since epoch (long)execution.dateStartedW3c: Start time as a W3C formatted Stringexecution.description: Summary string for the executionexecution.argstring: Argument string for any job optionsexecution.project: Project nameexecution.loglevel: Loglevel string ('ERROR','WARN','INFO','VERBOSE','DEBUG') The following values may be available after the job is finished (not available for onstart trigger):execution.failedNodeListString: Comma-separated list of any nodes that failed, if presentexecution.failedNodeList: Java List of any node names that failed, if presentexecution.succeededNodeListString: Comma-separated list of any nodes that succeeded, if presentexecution.succeededNodeList: Java List of any node names that succeeded, if presentexecution.nodestatus: Java Map containing summary counts of node success/failure/total, in the form: [succeeded: int, failed: int, total: int]execution.dateEnded: End time (java.util.Date)execution.dateEndedUnixtime: End time as milliseconds since epoch (long)execution.dateEndedW3c: End time as W3C formatted stringexecution.abortedby: User who aborted the execution
Option context variables are referred to as option.NAME (more about Job Options.)
Tips
There may be additional context variables available, such as data.* values when using the Data Capture Job Filter Plugins.
Context Variable Usage
Context variables can be used in a few ways in a Job step, with slightly different syntaxes:
- Commands, Script Arguments and Job Reference Arguments
${ctx.name}
- Inline Script Content (see note)
@ctx.name@
Note
The "Inline Script Content" variable expansion is not available for "Script File" steps. The Script File is not rewritten at all when used for execution.
Tips
This can be disabled, see Administrator Guide > Configuration File Reference > framework.properties.
- Environment Variables (see note)
$RD_CTX_NAME
The syntax for Environment variables is that all letters become uppercase, punctuation is replaced with underscore, and the name is prefixed with
RD_.
Note
See the chapter Configuring Remote Machine for SSH for information about requirements of the SSH server.
- Special syntax for different Scopes (see below)
About Context Variable Scopes
The job.*, and execution.* variables mentioned above exist in the Global scope.
Global Scope variables are available to all types of Workflow steps.
The node.* values are available within a Node scope. There can be multiple Node Scopes, and each Node Scope is bound to a particular Node Name.
Node Scope values for a particular Node name, are available within the same Scope for the same Node.
Variables that are added to the Context while the workflow is executing, such as data.* variables, get added to either the Global Scope or a Node Scope.
If the variable is added within a Node Step, then the data values are stored within the Node Scope for that node. This allows multiple values to be added by different nodes with the same variable name.
Any variables within the same Scope can be referenced without special syntax. For example, within a Node Step other variables added to the Context within the same Node Scope for the same node can be referenced using ${data.MyKey}.
If a value is not found for the variable reference within the current scope, the scope is "widened" to find it at a higher scope. So all Globally Scoped variable values can be referenced using the normal syntax.
Node Scope values can be referenced either from the Global scope or a different Node's scope by using a special syntax:
${data.MyKey@MyNodeName}- reference the variable within the Node scope for theMyNodeNamenode.${data.MyKey*}- collects all variable values from all Node Scopes, and produces a single value using a,(comma) to delimit the values.${data.MyKey*;}- specifies a different delimiter for the values
Tips
If a variable reference does not produce the value that is expected, make sure the Scope of the value and the Scope of the reference point (i.e where the context variable reference is being evaluated) correspond.
The Log Data Workflow Step will log all scoped context variables, to visualize what values are available at a certain point in a workflow.
The Workflow Strategy used in the Workflow governs when steps execute: A sequential strategy means each step will be processed before subsequent steps, which allows (for example) Step 2 to reference any value stored in Step 1, even from different Nodes. However, a Node-first, Parallel or Ruleset Strategy will have different behavior, so depending on the order in which Steps are executed, some captured values may or may not be present.
Data Capture Log Filter Plugins
Rundeck offers two different data capture Log Filter plugins. The first, Key Value Data, captures simple Key/Value data using a simple text format. The second, Multiline Regex Data Capture, captures multiline regex key/value data using a simple text format. The data capture Log Filter plugins allow users to define and utilize data variables across numerous job steps.
For more information on Key Value data, see Key Value Data.
For more information on Key Value data, see Multiline Regex Capture.
Command Line Tools and API access
Jobs can be exported or imported in XML or Yaml format using the API or the rd CLI tool.